Friday, March 25, 2011

Finally got to put an apron on again... and it wasn't for work :)


Here's a twist to one of my favorite cookie recipes: 1952 City School Ranger Cookies.
I guess I would just call the cookies I made today: Ranger Cookies

Here's the recipe:
1 c. butter (room temp)
1 c. sugar
1 c. brown sugar
2 eggs
2 c. four
1/2 tsp. baking powder
1/2 tsp. salt
1/2 tsp. baking soda
1 tsp. vanilla extract
2 c. rolled oats
*2. c. corn flakes
*1/2 c. coconut
*1/2 c. chocolate chips
*1/2 c. chopped walnuts
---------------------------
the rest of the recipe here is my twist... I used these ingredients instead of the asterisked ones (*) above:
2 c. Berry Yogurt Crunch Cereal 
1/2 c. chocolate chips
1/4 c. white chocolate chips

Directions:
Preheat oven to 350 degrees F. 
Cream butter with sugars until light and fluffy. Beat in eggs, one at a time. Mix in flour, baking powder, salt, and baking soda. Add oats, corn flakes, coconut, chocolate chips, and nuts. Stir until blended. 
Drop by Tbsps onto ungreased baking sheets. Flatten cookies with spatula. 
Bake for 10-13 minutes. Cookies should be slightly soft when taken out of oven.
Makes about 4 dozen cookies. 


The Ranger Cookies I made today were really good! I wanted to bake something and saw that we had 4 boxes of this Fiber Plus Berry Yogurt Crunch Cereal, so I thought... 1952 City School Ranger Cookies!! I really like the twist to this recipe because it has a fruity twist (like how cranberries taste in a cookie). But, I really like the original 1952 City School Ranger Cookies... I mean, it is awesome. All the different ingredients put together make an awesome cookie :) So that's why I included both recipes... you choose what kind of Ranger Cookies you want to make. Hey, your pantry may decide for you :) that's how it usually is for me!

Wednesday, February 16, 2011

Southern Comfort Ice Cream Pie


  • I made this for a friend's birthday... she said it was amazing, so good! 
  • There are so many ways to tweak this recipe... have fun with it and enjoy!
  • We love ice cream and this is the perfect way to make it a little more homemade :)

  • Recipe:
  • 2 cups of graham cracker crumbs
  • *1/4 cup finely chopped peanuts
  • 1/4 cup white sugar
  • 6 tablespoons melted butter
  • **3/4 cup coarsely chopped cashews
  • 1/4 cup coarsely chopped peanuts
  • 6 cups vanilla ice cream, softened
  • *2/3 cup creamy peanut butter
  • 2/3 cup hot fudge topping
  • chocolate shell topping
  • 1/4 cup chocolate shell topping

*instead of using chopped peanuts, you can use crunch peanut butter... it works great!
**instead of using cashews, you can use crushed Butterfinger

Directions

  1. Preheat oven to 350 degrees F (175 degrees C.) In a medium bowl, mix graham cracker crumbs, 1/4 cup finely chopped peanuts, sugar and melted butter until well blended . Press mixture into a 9 inch pie plate. Bake in preheated oven for 8 to 10 minutes, or until lightly browned. Allow to cool completely.
  2. Combine chopped cashews and 1/4 cup coarsely chopped peanuts; set aside. In a large bowl, mix ice cream with peanut butter; set aside.
  3. Spread half of hot fudge topping in bottom of crust. sprinkle with 1/3 of nut mixture. Spread half of ice cream in an even layer. Repeat layers. Drizzle with shell topping and sprinkle with remaining nuts. Freeze for at least 5 hours before serving.

Friday, January 28, 2011

The Food of Seattle

While we were in Tacoma we got to visit Pike Place Market in Seattle and saw some awesome shops!


Wednesday, December 29, 2010

Happy 26th Wedding Anniversary, MOM & DAD!

Our family went to Lawry's Five Crowns Restaurant to celebrate Mom and Dad's anniversary, and to save money, I offered to make desserts and we could enjoy them when we got home. Mom and Dad were all for it and I was excited to use my new cookbook. Jen's all time favorite dessert at Five Crowns is Créme Brúlée, so I had to make that and I also made Apple Pandowdy Pie. The Créme Brúlée I made was actually called Créme Brúlée Tartlets... as I told Jen, "Créme Brúlée will never be the same!" It was delicious and the pie was exquisite. There are so many versions of apple pie, and this was the first time I'd ever made a pandowdy pie. Soooo good! While both these recipes are fairly easy, I do not reccomned making both of these at the same time, especially if you are time constrained. Thankfully, Amy helped me by preparing the pie crusts and being my official "stirrer." We finished in time (including all the mess clean-up) and took the pie out of the oven as we were walking out the door to dinner... that's how it's done!

Here are links to the recipes:  Apple Pandowdy PieBasic Pie DoughBasic Tart Dough,  Créme Brúlée (The Créme Brúlée Tartlet Recipe isn't available online, but use the "Basic Tart Dough" recipe link--put that dough in about 6 Créme Brúlée dishes-- and then after those are fully baked, fill with the "Créme Brúlée" recipe link.)

Apple Pandowdy in the oven

Créme Brúlée Tartlet crusts in the oven

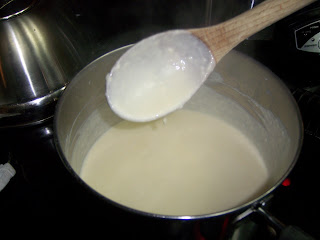
Créme Brúlée filling on the stove... get it thick, as to cover the spoon

while those are baking, I got going on those dishes! :/

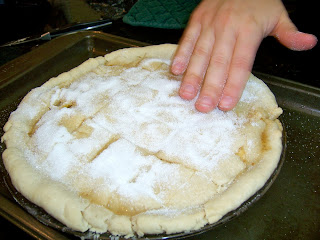
After the Apple Pandowdy Pie has baked for 30min, take it out of oven, cut the crisscross slits, and sprinkle with sugar.

At this time I put my silicone pie crust protector on too... it is awesome! The Fink family gave me this for Christmas, as well as a rolling pin, pie crust weights, & the Williams-Sonoma: Pie & Tart Recipe Book, that I got these recipes from :) Thank you... you know me well!

These are the Créme Brúlée Tartlet Crusts after baking. They sagged a little, but there wasn't much I could do and it wasn't a big problem. My only suggestion is that if you make this, make sure the tart crusts are thin. This Créme Brúlée Set was a present from my cousin Andrea, and was perfect for this recipe... thanks Andrea!! 

I poured the Créme Brúlée filling inside the baked tart crusts and then, put them in the fridge to set (3-4hrs). 


Apple Pandowdy Pie out of the oven... it looked great! No burnt crust... oh, and this crust is a new recipe as well (way better than Betty Crocker's--while hers is still in close 2nd!). Note: as you can see I put the pie on a pan to catch the drips, but I forgot to put foil down, so now I have to scrub the pan :( If that ever happens to you, fill the pan with water and soak it with a dryer sheet. It should help lift the char. :)

I thinly slice my apples, instead of 1/2 in. normal slices. They tend to stay in the pie--rather than falling out-- and it stacks nicely, letting you have more room for apples.

Enjoy á la mode! (aka with ice cream)

Sunday, December 12, 2010

Peanut Butter Blossoms


Amy, Katie, and I were talking about these cookies yesterday, so I thought I'd share this recipe with you. 

Ingredients

  • 48 HERSHEY'S KISSES Milk Chocolates
  • 1/2 cup shortening
  • 3/4 cup Creamy Peanut Butter
  • 1/3 cup granulated sugar
  • 1/3 cup packed light brown sugar
  • 1 egg
  • 2 tablespoons milk
  • 1 teaspoon vanilla extract
  • 1-1/2 cups all-purpose flour
  • 1 teaspoon baking soda
  • 1/2 teaspoon salt
  • Granulated sugar
  • Directions

    1. Heat oven to 375°F. Remove wrappers from chocolates. 

    2. Beat shortening and peanut butter in large bowl until well blended. Add 1/3 cup granulated sugar and brown sugar; beat until fluffy. Add egg, milk and vanilla; beat well. Stir together flour, baking soda and salt; gradually beat into peanut butter mixture. 

    3. Shape dough into 1-inch balls. Roll in granulated sugar; place on ungreased cookie sheet. 

    4. Bake 8 to 10 minutes or until lightly browned. Immediately press a chocolate into center of each cookie; cookie will crack around edges. Remove from cookie sheet to wire rack. Cool completely. About 4 dozen cookies.


Amy's math teacher from last year made her Peanut Butter Blossoms with Mini Reese's instead of Hershey Kisses... yum! 


Betty Crocker decorates some of her peanut butter cookies with chocolate sprinkles :)


Sunday, December 5, 2010

Frozen Hot Chocolate

Ingredients

  • 3/4 cup sugar
  • 1/2 cup baking cocoa
  • 2-3/4 cups 2% milk, divided
  • 1/4 cup reduced-fat whipped topping
  • 4 teaspoons chocolate syrup

Directions

  • In a large saucepan, combine sugar and cocoa. Gradually add milk, reserving 2 tablespoons for blending; cook and stir until heated through and sugar is dissolved. Remove from the heat and let cool.
  • Transfer to an 8-in. square dish. Freeze for 2 hours or until edges begin to firm. Stir and return to freezer. Freeze 4 hours longer or until firm.
  • Just before serving, transfer to a food processor; cover and process with remaining milk until smooth. Garnish with whipped topping and chocolate syrup.  Yield: 4 servings.

Tuesday, November 30, 2010

Chicken and Artichoke Pasta Recipe

Chicken and Artichoke Pasta

Chicken and Artichoke Pasta Recipe
Photo by: Taste of Home
Rating 4.17
83% would make again
“Without a doubt, this is the meal my husband requests most often. I like to serve it with a loaf of crusty French bread. It makes a speedy weeknight dinner.” Laurel Johnson - Sterling Heights, MI
This recipe is:
Quick
    This was emailed to me as a part of Taste of Home's recipe of the day.
    It looks delicious and pretty straightforward.
    The nutrition facts are at the bottom, not too scary!
    Let me know if you try it out :) Love, Anna
  • 5 Servings
  • Prep/Total Time: 30 min.

Ingredients

  • 4 cups uncooked bow tie pasta
  • 1 pound chicken tenderloins, cut into 1-inch pieces
  • 2 tablespoons olive oil, divided
  • 1/2 pound sliced fresh mushrooms
  • 1/2 cup chopped green onions
  • 2 tablespoons white wine or Progresso ® Chicken Broth
  • 1 can (14-1/2 ounces) diced tomatoes with roasted garlic, undrained
  • 1 can (14 ounces) water-packed quartered artichoke hearts, rinsed and drained
  • 1/4 teaspoon salt
  • 2 teaspoons cornstarch
  • 2 teaspoons cold water
  • 1 tablespoon thinly sliced fresh basil or 1 teaspoon dried basil
  • 1/2 cup shaved Parmesan cheese

Directions

  • Cook pasta according to package directions. Meanwhile, in a large skillet, saute chicken in 1 tablespoon oil until no longer pink. Remove and keep warm.
  • In the same skillet, saute mushrooms and onions in remaining oil until tender; add wine stirring to loosen browned bits from pan. Reduce heat to medium. Stir in the tomatoes, artichokes, salt and chicken. Cook and stir for 4-5 minutes or until heated through.
  • Combine cornstarch and water until smooth. Gradually stir into pan. Bring to a boil; cook and stir for 1 minute or until thickened. Stir in basil. Drain pasta; serve with chicken mixture and cheese. Yield: 5 servings.
Nutrition Facts: 1 cup chicken mixture with 1 cup pasta equals 463 calories, 10 g fat (2 g saturated fat), 59 mg cholesterol, 875 mg sodium, 59 g carbohydrate, 4 g fiber, 36 g protein.
Chicken and Artichoke Pasta published in Simple & Delicious November/December 2009, p29